
Uploading Models
Upload Dialog
To upload a model to ATLAS, open the right hand panel and select the upload icon from within the top menu.
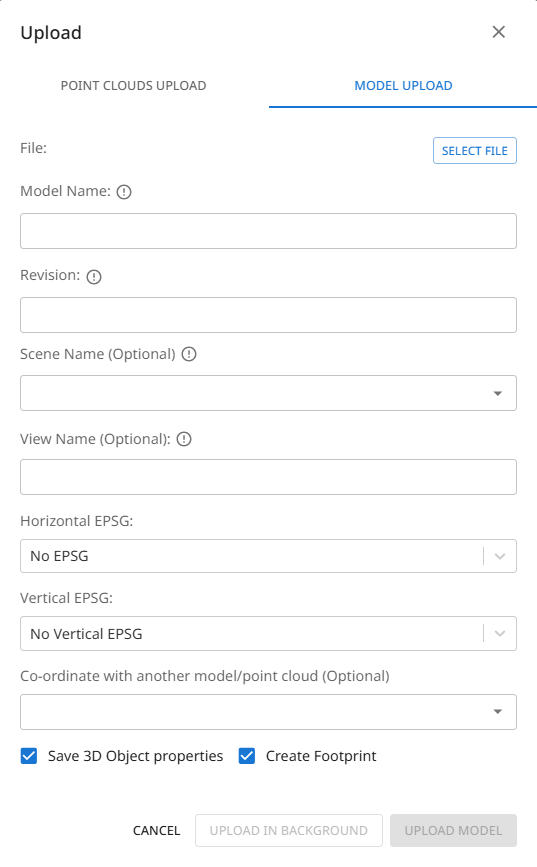
Within the upload dialog box that appears, select the 'Model' tab at the top.
-
Select your file for upload.
-
Enter your desired model name. By default the uploaded filename will be used as the model name, but this can be overwritten.
-
Enter the model revision.
-
Scene Name (Optional): If you intend to upload multiple models (and/or point clouds), that will form a complete scene together, you can enter the same scene name for each upload. When A model from that scene is then loaded into the view, all other files associated to that scene will also load. This is a good way to keep federated models grouped.
-
View Name (Optional): If your native modelling software uses view names, and these are defined for your model, you can enter the view name to upload the model as per that view.
-
EPSG settings (Optional): If your models are geolocated using a specific EPSG (coordinate system), you can select it from the list to ensure that the models are uploaded to the correct position upon the GIS map layer.
If your EPSG is not listed, please get in contact via [email protected] and we can arrange for it to be added for you.
If you do not need to geolocate a model, select 'No EPSG' within the selection fields. The model will then be uploaded in free space. -
Coordinate with another model/point cloud (optional): If you are unsure of the EPSG but have an existing model or point cloud that you know is correct to match with, you can inherit the EPSG by selecting that model or point cloud.
-
Save 3D Object Properties: Check this option if you wish to bring in all the associated model element attribute data held within the model file - this will then be viewable and searchable within ATLAS.
-
Create Footprint: Select this option if you require a 2D footprint of your model to be generated and displayed on the GIS map layer.
-
Click upon 'Upload Model'
This will trigger the model's upload and you will be notified within the notifications panel.
Upload Notifications
On triggering an upload, a notification will be received providing some estimated processing timescales. Upon stage 1 completion, the overall timescale will be readjusted.
Example notification text:
"Model upload has been triggered for [model_name]. Your model shoud be visible in approximatively [x] minutes. The whole processing should be done in [y] minutes"
When a model upload is complete (stage 1 & 2) a notifcation email will also be provided.

Upload in Progress

Upload Stage 1 Successful

Upload Stage 2 Successful
If an upload fails, a failure notification will be provided and a notification email. You will have the option to retry the upload or delete the model.

Upload Failed
Upload Processing Stages
When a model upload is triggered the model is processed in two key stages, this is to allow for quicker viewability of the model.
First Stage - Element Tiling
During this stage each model element is created as a tiled element within ATLAS. Once complete, the model geometry is ready for viewing.
Within the right-hand model panel, the processing icon against the model will become a green tick withing a green circle, and clicking the model row will load the model geometry into view.
At this stage any associated model data is not yet available.
Second Stage - Model Data
Once the model has been tiled, the second stage then brings in any existing model data (attribution against model elements from the native model file).
Bringing in such data primarily allows for the model hierarchy to be displayed and also for element properties to be viewed upon element selection. But further to this, model data allows for deeper interrogation of the model via searching and automated model checks etc.
Upon completion of the second stage, the model processing icon will change to a solid green circle with a white tick.
If the model was already loaded for viewing whilst the second stage was still in progress, a refresh icon will appear to the left of the tick icon - clicking this will refresh the loaded model so that the model hierarchy and data are viewable.
Updated 5 months ago