
Model Asset Creation and Tagging
Creating Assets from Models and Writing Data back
ATLAS allows for the creation of assets based on uploaded models. Assets can either be created automatically upon model upload, or manually via the selection of model elements and specifying their asset classification.
Assets created are related to the model elements against which they are created, and data added against the assets can be written back to the native model to complete a golden thread of information.
Pre-requisites
To allow for asset creation from a model, an Asset Configuration is requried within the AIMS module of ATLAS. This Asset Configuration will contain the asset classifications that model element assets will be created against.
Automated Asset Creation
Model Tagging Settings (Admin Setting)
To enable the automated creation of assets based upon model element attribution, the Model Tagging Settings need configuring.
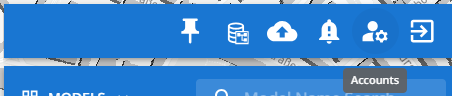
- Within ATLAS head to the Account Details menu option:
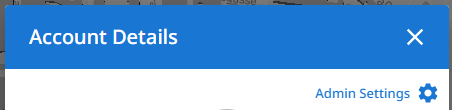
- Then click on 'Admin Settings' within the pop-up:
-
Head to Model Tagging Settings:
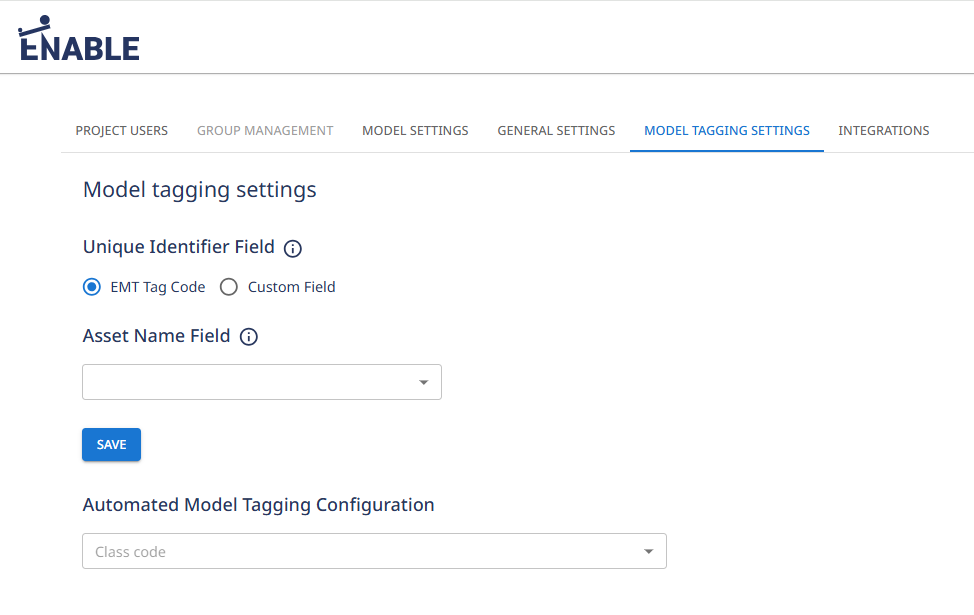
Currently Only the EMT Tag Code can be set as the Unique Identifier Field.
-
Under the section 'Automated Model Tagging Configuration':
-
Select a Class code (the classes listed will reflect the active Asset Configuration for the project).
-
For the model elements that will be mapped to the selected class to create assets, identify the element model attribute(s) and attribute value(s) that distinguishes the asset type.
-
Set the attribute and attribute value within the model tagging configuration.

-
(optional) To map data fields from the model element to the class attributes so that when assets are created, any data held against the model element field will copy to the corresponding attribute against the asset created. Add the desired mapping under the Mapping section.

-
Save the configuration
-
Repeat the above steps to configure all required Model Element to Asset Class mapping configurations.
-
-
Once mapping configurations have been set, they will be used to automatically classify and create assets for the model elements, when the 'Apply Automated Tagging' option is used under Model Tagging.
Running Automated Asset Creation
After adding the model tagging settings, to run the model tagging in line with these settings:
-
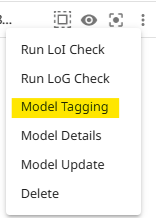
Under the Model menu, select Model Tagging.

-
Within the Model Tagging table, click on the 'Apply Automated Tagging' button within the table header.

-
Confirm the prompt.
-
Once the asset creation process has completed, the table will display the Asset Type and EMT Tag Code against each element that has been tagged, along with an 'in progress' status under the 'Tag Element' column.
Manual Asset Creation
Manual asset creation does not involve the requirement of updating the Model Tagging Configuration settings.
To manually create assets for model elements:
-
Under the Model menu, select Model Tagging.

-
Within the model tagging table, locate or filter for the elements you wish to created assets for. Alternatively select the model element directly on the model - this will dynamically filter the table to the selected elements. You can also use the model hierarchy or the model search to select specific elements.
-
If the table is filtered and all filtered elements are to have assets creeated of the same asset class, click upon the 'Tag Filtered' button within the table header. If the elements should be of different asset types, either apply further filters to the table, then use the 'Tag Filtered', or against each element click upon the 'Tag' button.
-
Within the Model Tagging - Asset Creation dialog box:
- Select the Asset Type to classify the elements as.
- Select the Discipline to which the Asset Type belongs.
-
Click on Apply.
-
Once the asset creation process has completed, the table will display the Asset Type and EMT Tag Code against each element that has been tagged, along with an 'in progress' status under the 'Tag Element' column.
Saving Model Tags
Upon the automated and/or manual tagging being completed, the 'Tag Element' status will be 'in progress'. This indicates that the updates have not yet been published to the wider project.
To publish the changes, click upon 'Save Tagging' within the model tagging table header.

Viewing Model Tags
To view the Model Tagging table, select Model Tagging from the model menu. This will open the table and display all model elements grouped by thier Element Type, then Object Name as specified within the model's element attributes.
If an element has already had an asset created against it, the table will display the Asset Type and EMT Tag Code against the element row.
Viewing a Model's Assocated Assets
The assets associated with the model elements are held within the ATLAS AIMS module. To view the assets associated to a model, click upon the 'View Assets in AIMS' button along the Model Tagging table header.
This will open the AIMS module within a new tab, with the associated assets filtered within the asset tree view.
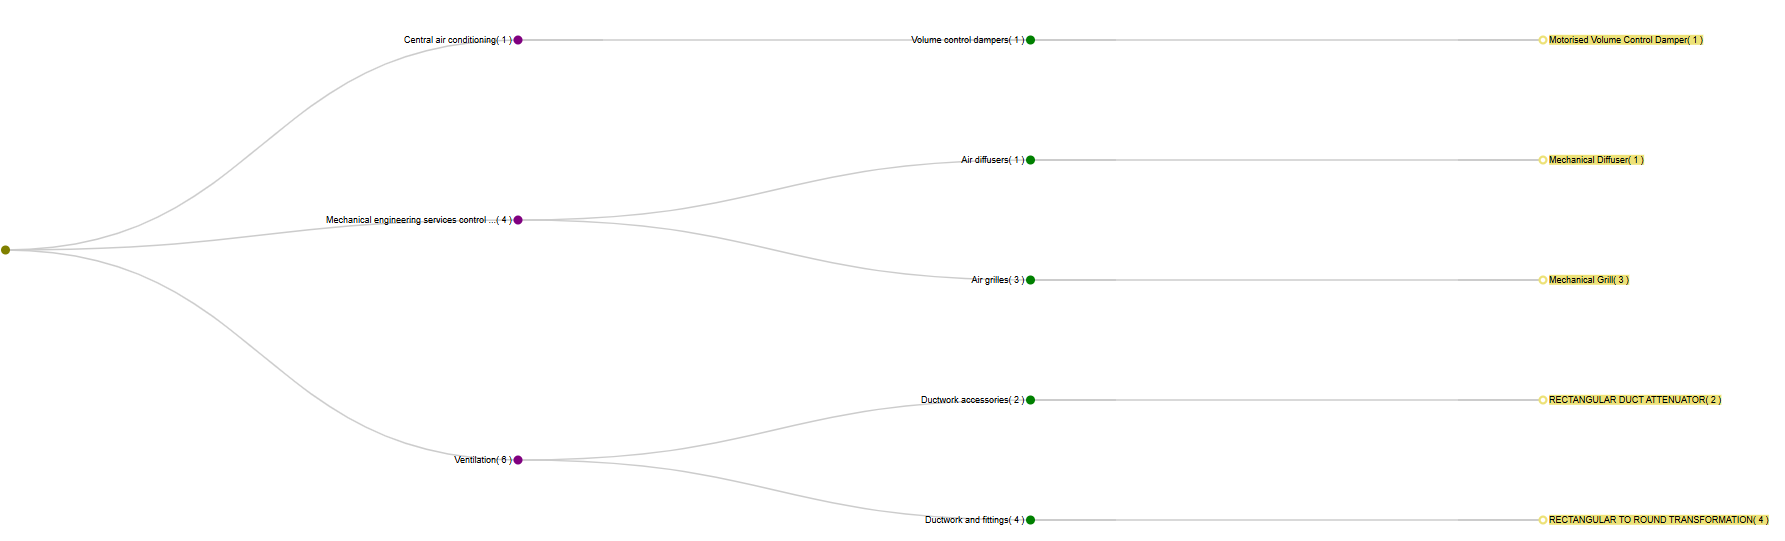
From there, to view specific asset details, click upon the desired asset type within the tree and this will open the Smartgrid for that asset type, displaying all assets of that type along with their associate attribute details.

Viewing Associate Asset Details
Against the EMT Tag Codes within the Model Tagging table, click upon the information 'i' button. This will open a pop-up that displays the assets associated attribute information as held within the ATLAS AIMS module.
Tagging Native Models
Upon the model tagging being saved for a model within ATLAS - all required elements having an associated asset - then the associated asset tag information can be written back against the native model.
-
Click upon the 'Tag Native' button along the top of the Model Tagging Table.

-
Confirm the prompt.
-
Upon the completion of the Native Model Tagging, an 'Export Native Model' option will appear along the top of the Model Tagging table. Clicking this will download the native model file updated with the associated model tagging data, which will be available when opening the model in native software.
Updated 6 months ago