
Views & Sharing
How to create, share and access saved views of your point clouds in ATLAS
Camera Views and Sharing
-
Ensure you have watched the Navigation Tutorial in ATLAS to understand the various ways to open and load a Point Cloud.
-
Navigate the Point Cloud to the desired viewpoint.
-
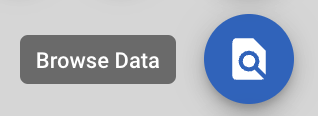
On the right-hand side, select “Browse Data.”
-
Choose the Drop Down Arrow next to ‘Point Clouds’ at the top of the menu.
-
Select “Camera View.” This loads all camera views created by and shared with you.
-
To create a new camera view, select “Create Camera View.”
-
Enter a name for the camera view in the provided free-text field.
-
Click “Create.” A pop-up will appear in the left-hand corner stating “Successfully Created Camera View.”
-
The new camera view will be available within the menu bar, possibly at the bottom of the list.
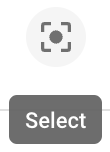
Viewing Camera View:
-
Click the “Select” button to load the camera view.
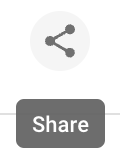
Sharing Camera View:
-
Click the “Share” button to share the view with other users.
-
Enter the email address of user/s or select from the drop-down menu
-
Click “Share.” Users will receive an email notification of the shared camera view. Refer to the Viewing Shared Camera Views Tutorial (hyperlink) to understand how to view items shared with you.
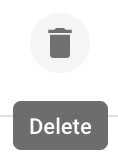
Deleting Camera View:
-
Click the “Delete” button to delete any camera views created within ATLAS.
-
A pop-up window will appear to confirm the action. Select “Confirm” to delete the Camera View or “Cancel” to keep the Camera View within ATLAS.
NB. Please note that deleting a camera view will remove it entirely from ATLAS, including for anyone it has been shared with.
Updated 4 months ago